Eagle Scout Service Project Guide: How to Plan and Lead Your Project
The Eagle Scout Service Project is your chance to lead a major project from start to finish. Requirement 5 states:
“While a Life Scout, plan, develop, and give leadership to others in a service project helpful to any religious institution, any school, or your community. (The project must benefit an organization other than the Boy Scouts of America.) A project proposal must be approved by the organization benefiting from the effort, your Scoutmaster and unit committee, and the council or district before you start.”
Your job is not to do all the physical work alone—your job is to be the leader who plans the project, organizes the supplies, and directs volunteers.
What Counts as an Eagle Project?
Before you write your proposal, make sure your idea meets national Scouting America standards:
Good Projects vs. Projects That Won’t Qualify
| Project Category | Great Eagle Project Examples | Projects That Do Not Qualify |
|---|---|---|
| Parks & Outdoors | Building hiking trails, footbridges, outdoor classrooms, or community gardens | Routine Chores: Mowing grass, pulling weeds, or basic maintenance an organization normally does |
| Community Centers | Fixing up a food pantry, animal shelter room, or museum display | Scouting Projects: Improvements to your troop room, scout camp, or council property |
| Schools & Safety | Making sensory rooms for schools or emergency supply kits for the town | For-Profit Work: Any project that helps a private business make money |
| Public Benches & Boxes | Building park benches, trail kiosks, or flag retirement boxes for public parks or houses of worship | Just Raising Money: A project that only collects money with no hands-on leadership |
Parks & Outdoors
- Great Eagle Project Examples
- Building hiking trails, footbridges, outdoor classrooms, or community gardens
- Projects That Do Not Qualify
- Routine Chores: Mowing grass, pulling weeds, or basic maintenance an organization normally does
Community Centers
- Great Eagle Project Examples
- Fixing up a food pantry, animal shelter room, or museum display
- Projects That Do Not Qualify
- Scouting Projects: Improvements to your troop room, scout camp, or council property
Schools & Safety
- Great Eagle Project Examples
- Making sensory rooms for schools or emergency supply kits for the town
- Projects That Do Not Qualify
- For-Profit Work: Any project that helps a private business make money
Public Benches & Boxes
- Great Eagle Project Examples
- Building park benches, trail kiosks, or flag retirement boxes for public parks or houses of worship
- Projects That Do Not Qualify
- Just Raising Money: A project that only collects money with no hands-on leadership
The 8 Steps to Complete Your Project
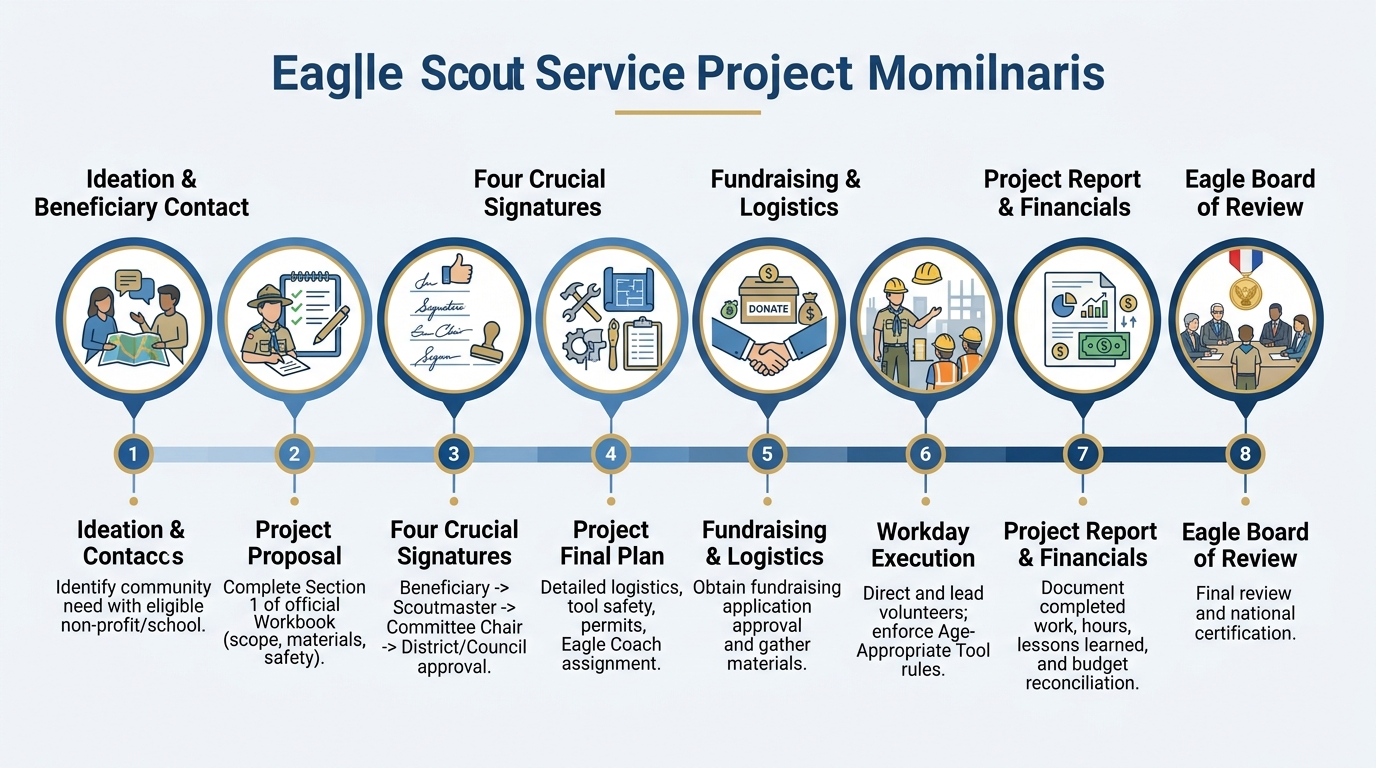
The 4 Signatures You Need Before Starting
You must fill out the Project Proposal section in the official Eagle Scout Service Project Workbook and get four signatures in this exact order before doing any project work:
| Order | Who Signs | What They Check | When They Sign |
|---|---|---|---|
| 1st Signature | Beneficiary Representative | Confirms the project helps their organization and gives you permission to work | Must sign first before your Scoutmaster |
| 2nd Signature | Scoutmaster / Unit Leader | Confirms the project idea is solid and that you are an active Life Scout | Signs after the beneficiary approves |
| 3rd Signature | Troop Committee Chair | Confirms the troop supports your safety plan and adult supervision | Signs after your Scoutmaster |
| 4th Signature | District Advancement Chair | Makes sure your project meets national Scouting America guidelines | Must have this signature before you buy materials, raise money, or do any work! |
1st Signature
- Who Signs
- Beneficiary Representative
- What They Check
- Confirms the project helps their organization and gives you permission to work
- When They Sign
- Must sign first before your Scoutmaster
2nd Signature
- Who Signs
- Scoutmaster / Unit Leader
- What They Check
- Confirms the project idea is solid and that you are an active Life Scout
- When They Sign
- Signs after the beneficiary approves
3rd Signature
- Who Signs
- Troop Committee Chair
- What They Check
- Confirms the troop supports your safety plan and adult supervision
- When They Sign
- Signs after your Scoutmaster
4th Signature
- Who Signs
- District Advancement Chair
- What They Check
- Makes sure your project meets national Scouting America guidelines
- When They Sign
- Must have this signature before you buy materials, raise money, or do any work!
Raising Money and Buying Supplies
Follow these simple rules when funding your project:
When You Need a Fundraising Form
- No Form Needed: Donations coming directly from the beneficiary, yourself, your parents, your troop, or your chartered organization.
- Fundraising Form Required: Car washes, bake sales, restaurant nights, or asking local businesses for money or materials. You must get the form signed by your beneficiary, Scoutmaster, and district chair before asking for money.
Leftover Money Rule
Any leftover money raised for your project belongs to the beneficiary organization or the troop project fund. You and your family can never keep leftover funds.
Tool Safety and Age Rules
Keep all your volunteers safe by following Scouting America tool safety rules:
| Volunteer Age Group | Tools They Can Use | Tools They Cannot Use |
|---|---|---|
| Youth Under 14 | Hand tools only (screwdrivers, hammers, hand saws, rakes, paintbrushes, shovels) | Any power tools, power mowers, string trimmers, power drills |
| Youth 14 – 15 | Cordless power drills, sanders, small hand power tools (with 1-on-1 adult supervision) | Circular saws, table saws, chainsaws, motorized augers, nail guns |
| Youth 16 – 17 | Lawn mowers, string trimmers, light power tools with eye protection | Chainsaws, log splitters, commercial trenchers, working higher than 6 feet off the ground |
| Adults 18+ Only | Circular saws, miter saws, nail guns, tillers, post-hole augers | Chainsaws (require specialized chainsaw safety training) |
Youth Under 14
- Tools They Can Use
- Hand tools only (screwdrivers, hammers, hand saws, rakes, paintbrushes, shovels)
- Tools They Cannot Use
- Any power tools, power mowers, string trimmers, power drills
Youth 14 – 15
- Tools They Can Use
- Cordless power drills, sanders, small hand power tools (with 1-on-1 adult supervision)
- Tools They Cannot Use
- Circular saws, table saws, chainsaws, motorized augers, nail guns
Youth 16 – 17
- Tools They Can Use
- Lawn mowers, string trimmers, light power tools with eye protection
- Tools They Cannot Use
- Chainsaws, log splitters, commercial trenchers, working higher than 6 feet off the ground
Adults 18+ Only
- Tools They Can Use
- Circular saws, miter saws, nail guns, tillers, post-hole augers
- Tools They Cannot Use
- Chainsaws (require specialized chainsaw safety training)
How to Lead on Project Workday
On your project workday, you are the project manager—not the only person working.
| Role on Workday | What They Do | How They Help You Lead |
|---|---|---|
| Eagle Candidate (You!) | Keep the project on schedule, check quality, watch for safety hazards | Walk the site, answer questions, encourage volunteers, keep things moving |
| Crew Leader 1 (e.g. Groundwork) | Lead 3–4 youth volunteers on site prep and digging | Watch safety lines, check hole depth, ensure teamwork |
| Crew Leader 2 (e.g. Assembly) | Lead 3–4 youth volunteers on measuring, cutting, and assembly | Check safety glasses, double-check measurements, keep cuts straight |
| Troop Scribe / Registrar | Run the check-in table and log all volunteer hours | Record arrival/departure times, hand out water and snacks |
Eagle Candidate (You!)
- What They Do
- Keep the project on schedule, check quality, watch for safety hazards
- How They Help You Lead
- Walk the site, answer questions, encourage volunteers, keep things moving
Crew Leader 1 (e.g. Groundwork)
- What They Do
- Lead 3–4 youth volunteers on site prep and digging
- How They Help You Lead
- Watch safety lines, check hole depth, ensure teamwork
Crew Leader 2 (e.g. Assembly)
- What They Do
- Lead 3–4 youth volunteers on measuring, cutting, and assembly
- How They Help You Lead
- Check safety glasses, double-check measurements, keep cuts straight
Troop Scribe / Registrar
- What They Do
- Run the check-in table and log all volunteer hours
- How They Help You Lead
- Record arrival/departure times, hand out water and snacks
How to Run Your Workday Morning
- Sign-In Table: Have every volunteer sign in with their arrival time, phone number, and emergency contact.
- Safety Briefing: Gather everyone before starting. Point out the first aid kit, water station, mandatory safety glasses, and tool rules.
- Assign Small Teams: Break volunteers into small teams with assigned Crew Leaders and give each team clear instructions.
- Walk the Site & Encourage: Move around the project continuously. Check measurements, praise great work, call water breaks, and fix problems.
- Clean Up: Make sure every tool is cleaned and counted, scrap wood is recycled or tossed, and the worksite looks great.
Finishing Your Project Report
Once the physical work is complete, finish the Project Report in your workbook:
- What You Did: Explain how the project turned out and how it helped the beneficiary.
- Changes You Made: Note any changes you had to make because of weather, supplies, or unexpected site conditions.
- What You Learned: Write about what went well and what challenged you as a leader.
- Final Financial Table: Complete the simple accounting table:
| Supply Category | Estimated Cost | Actual Cost | Difference | Who Paid for It |
|---|---|---|---|---|
| Lumber & Screws | $450.00 | $412.50 | -$37.50 | Local Hardware Discount + Troop Fund |
| Paint & Brushes | $120.00 | $135.00 | +$15.00 | Beneficiary Donation |
| Safety Glasses & Gloves | $40.00 | $32.00 | -$8.00 | Scout Family Donation |
| Snacks & Drinks | $75.00 | $68.00 | -$7.00 | Parent Bake Sale |
| TOTAL | $685.00 | $647.50 | -$37.50 | Balanced |
Lumber & Screws
- Estimated Cost
- $450.00
- Actual Cost
- $412.50
- Difference
- -$37.50
- Who Paid for It
- Local Hardware Discount + Troop Fund
Paint & Brushes
- Estimated Cost
- $120.00
- Actual Cost
- $135.00
- Difference
- +$15.00
- Who Paid for It
- Beneficiary Donation
Safety Glasses & Gloves
- Estimated Cost
- $40.00
- Actual Cost
- $32.00
- Difference
- -$8.00
- Who Paid for It
- Scout Family Donation
Snacks & Drinks
- Estimated Cost
- $75.00
- Actual Cost
- $68.00
- Difference
- -$7.00
- Who Paid for It
- Parent Bake Sale
TOTAL
- Estimated Cost
- $685.00
- Actual Cost
- $647.50
- Difference
- -$37.50
- Who Paid for It
- Balanced
Eagle Project Checklist
Eagle Scout Service Project Checklist
Track your steps from first idea to final approval
- Reach the rank of Life Scout.
- Download the official Eagle Scout Service Project Workbook.
- Meet with your beneficiary to find a project that helps their organization.
- Write your Project Proposal with supply lists, safety notes, and cost estimates.
- Get Beneficiary Representative signature.
- Get Scoutmaster signature.
- Get Troop Committee Chair signature.
- Submit your proposal to District Advancement and get their signature.
- Write your detailed Project Plan with measurements, diagrams, and steps.
- Submit a Fundraising Application (if raising money from outside sources).
- Order supplies, gather tools, and recruit youth and adult volunteers.
- Hold your workdays; log all volunteer hours.
- Clean up the site and return borrowed equipment.
- Fill out the Project Report and final cost sheet.
- Get Beneficiary Representative final signature.
- Get Scoutmaster final signature.
- Turn in your Eagle application and get ready for your Board of Review!