Navigation & Weather Guide: Maps, Compasses & Forecasting
Precision navigation and weather awareness are the core survival skills of the wilderness traveler. Being able to read the land, plot an accurate course across trackless terrain, and predict approaching storms from cloud and barometric cues keeps a patrol safe and self-reliant.
Topographic Map Fundamentals
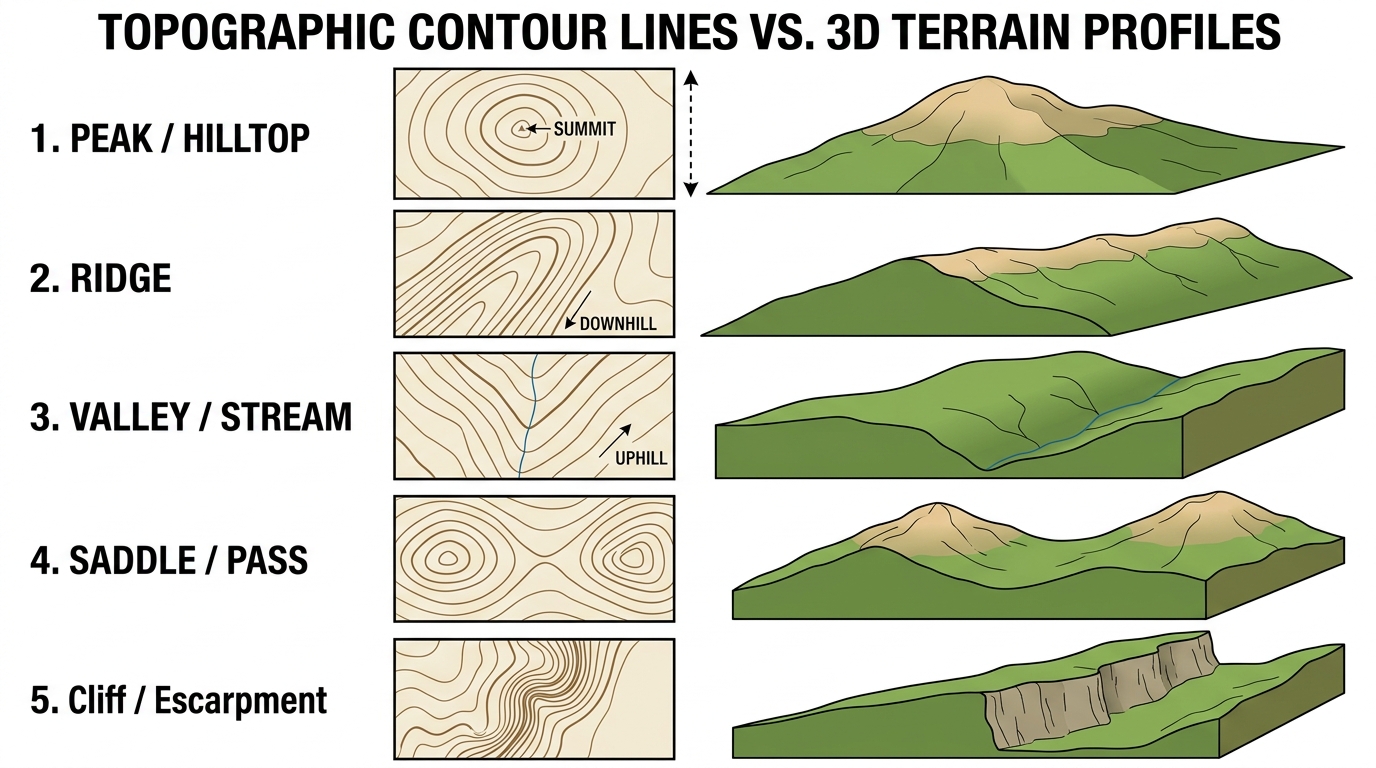
Topographic maps represent the three-dimensional shapes of the Earth’s surface on a flat two-dimensional plane using contour lines.
USGS 1:24,000 Quadrangle Scale
The standard United States Geological Survey (USGS) 7.5-minute quadrangle map uses a representative fraction of 1:24,000:
- $1\text{ inch on map} = 24,000\text{ inches on ground} = 2,000\text{ feet}$
- $1\text{ centimeter on map} = 240\text{ meters on ground}$
- $2.64\text{ inches on map} = 1\text{ statute mile}$
Reading Contour Lines & Terrain Features
- Index Contours: Heavy, bold brown lines with elevation numbers printed periodically (typically every 5th line, e.g., 1,000 ft, 1,100 ft).
- Intermediate Contours: Thinner brown lines between index contours.
- Contour Interval (C.I.): The vertical elevation gain between any two adjacent contour lines (found in the map legend, usually 20, 40, or 80 feet).
- Slope Steepness:
- Widely spaced contours: Flat terrain, broad valleys, gentle meadows.
- Closely spaced contours: Steep hillsides, cliffs, canyons.
- Contour lines touching or merging: Vertical cliff face or escarpment.
UTM (Universal Transverse Mercator) & MGRS Grid Coordinates
The UTM grid system divides the globe into 60 zones of 6° longitude each and overlays a metric rectangular grid with 1,000-meter (1 km) squares.
- The Golden Rule of Map Reading: “Read RIGHT, then UP” (Easting coordinate first, then Northing coordinate).
- UTM Format (6-Digit / 100m Precision):
- Easting (3 digits):
482(Column line48plus200meters east). - Northing (3 digits):
735(Row line73plus500meters north). - Combined Coordinate:
482 735(Pinpoints a 100m x 100m square).
- Easting (3 digits):
- Using a Corner Roamer / Coordinate Scale: Place the corner of a 1:24,000 metric roamer on the target point and read the precise meters from the grid lines.
Compass Mechanics & Bearing Mastery
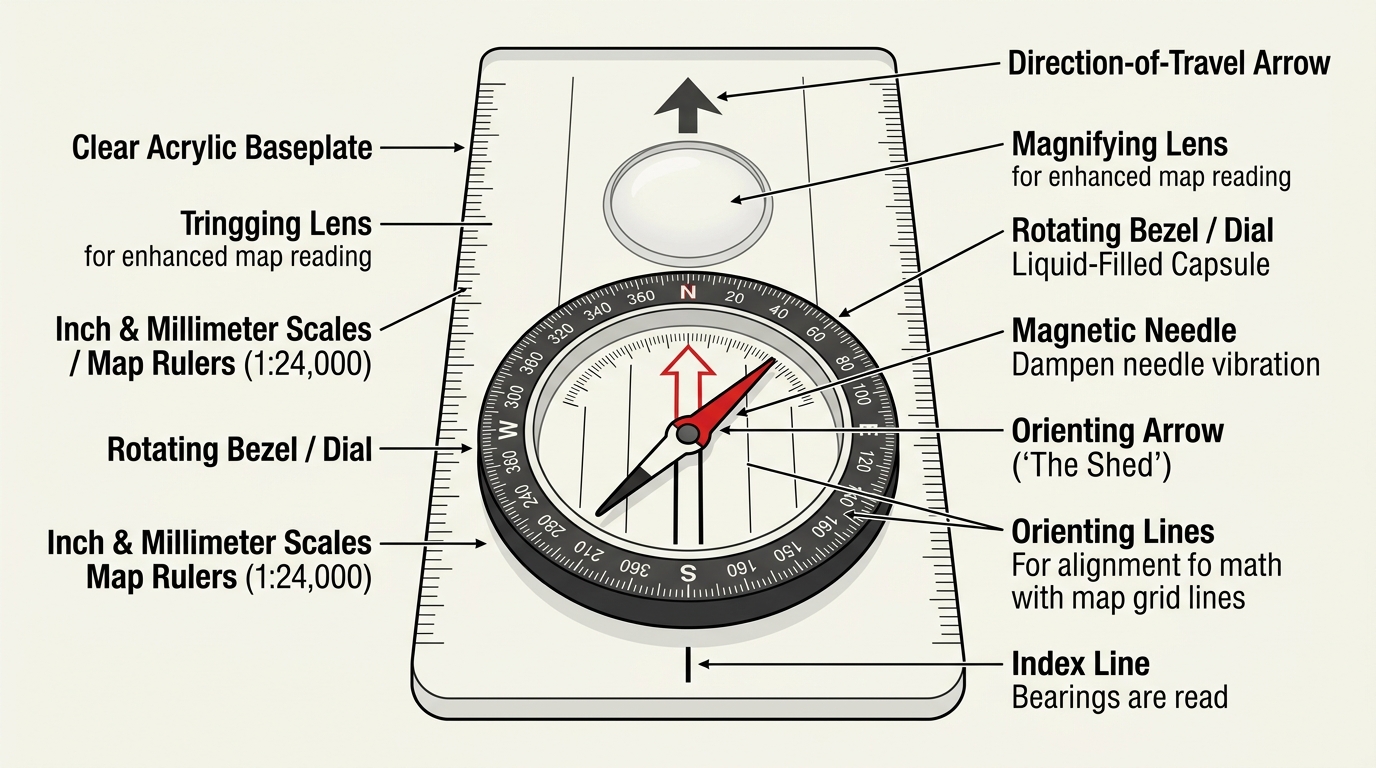
A standard baseplate (orienteering) compass is a precision navigational instrument.
Key Components
- Baseplate: Clear acrylic base with straight measuring edges and scales.
- Direction of Travel Arrow: Points in the direction you intend to walk.
- Rotating Bezel (Housing): Ring marked in 360° increments (Azimuth).
- Magnetic Needle: Red tip magnetized to point to Magnetic North.
- Orienting Arrow (“The Shed”): Outline arrow inside the housing floor.
- Orienting Lines: Parallel lines aligned with map North-South grid lines.
- Index Mark: The fixed line at the top of the housing where bearings are read.
Step-by-Step Bearing Protocols
Taking a Field Bearing (Sighting an Object)
- Point the Direction of Travel Arrow directly at the distant target (mountain peak, lone tree, fire tower).
- Hold the compass flat at waist level (or at eye level if equipped with a sighting mirror).
- Rotate the compass bezel until the red orienting arrow aligns underneath the red magnetic needle (“Put Red in the Shed”).
- Read the exact numeric degree value at the Index Line. This is your magnetic bearing.
Taking a Map Bearing (From Point A to Point B)
- Lay the compass on the map with the baseplate edge connecting your current position (Point A) to your destination (Point B).
- Ensure the Direction of Travel Arrow points toward Point B.
- Keep the baseplate firmly pinned in place. Rotate the bezel until the internal orienting lines run strictly parallel to the map’s North-South grid lines (with the ‘N’ pointing toward the top of the map).
- Read the Grid Bearing at the Index Line.
- Apply magnetic declination before following this bearing in the field with your compass.
Walking on a Bearing (Preventing Lateral Drift)
- Do not walk with your eyes glued to the compass needle.
- Sight along the Direction of Travel Arrow to identify a distinct intermediate landmark on the horizon (e.g., a lightning-struck pine, unique rock boulder).
- Walk directly to that intermediate landmark without looking at the compass.
- Repeat the process from that landmark to the next waypoint.
Magnetic Declination De-Mystified
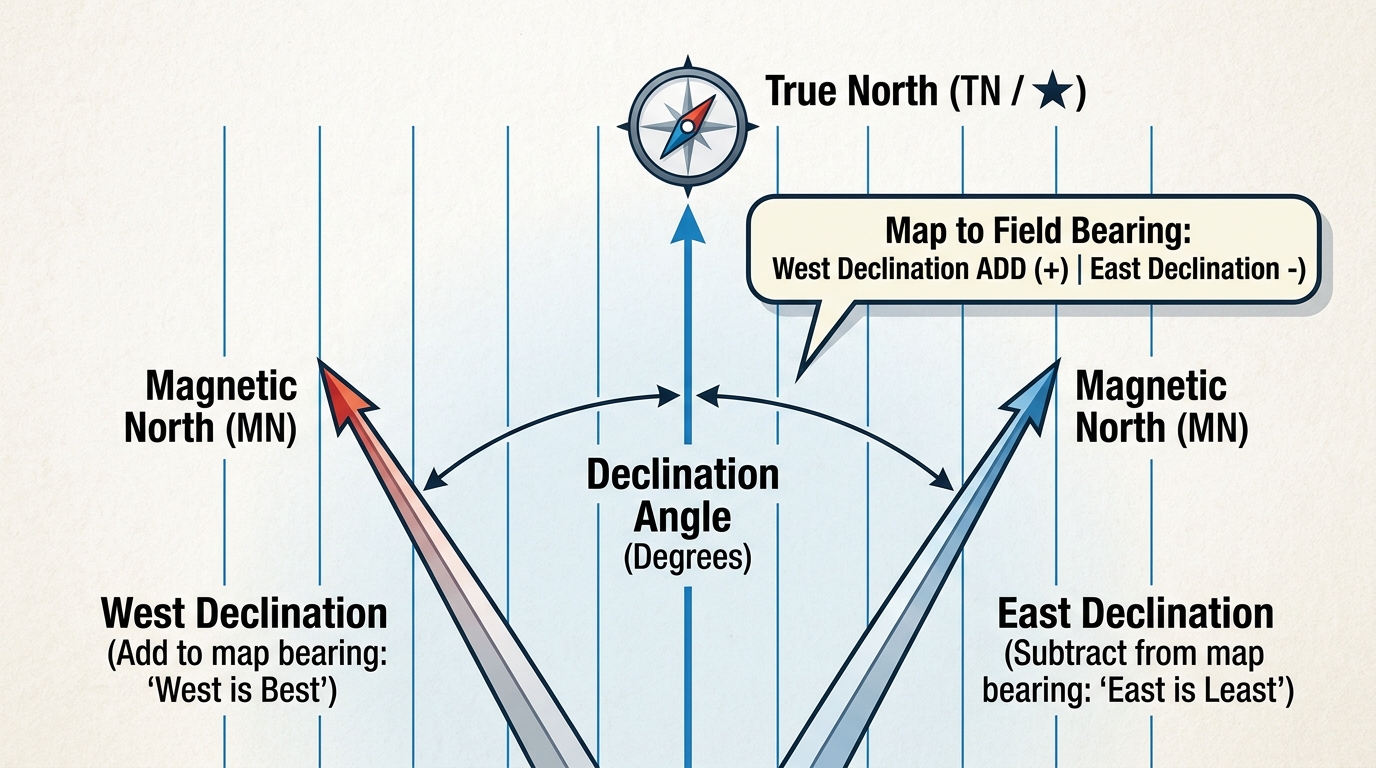
Magnetic Declination is the angle between True North (the geographic North Pole) and Magnetic North (where the compass needle points toward the Earth’s magnetic core).
The Declination Conversion Rules
- Map to Field (Grid to Magnetic):
- West Declination: ADD declination to map bearing (Grid + Declination = Magnetic).
- East Declination: SUBTRACT declination from map (Grid - Declination = Magnetic).
- Mnemonic: “MAP TO FIELD: East is Least (Subtract), West is Best (Add)”
- Field to Map (Magnetic to Grid):
- West Declination: SUBTRACT declination from field (Magnetic - Declination = Grid).
- East Declination: ADD declination to field (Magnetic + Declination = Grid).
Worked Example:
- You calculate a grid bearing of $085^\circ$ on a USGS map in Maine (where declination is $15^\circ\text{ West}$).
- Magnetic Bearing to set on compass = $085^\circ + 15^\circ = \mathbf{100^\circ}$.
Pace Factor & Distance Estimation
A Pace is defined as two natural walking steps (every time your dominant foot strikes the ground).
Calibrating Your Personal Pace Factor
- Measure out an exact 100-meter (or 300-foot) level course on natural terrain using a surveyor’s tape.
- Walk the course at your standard trail stride, counting every time your left (or right) foot hits the ground.
- Repeat three times and calculate the average.
- Example: 62, 61, 63 paces = 62 paces per 100 meters (approx. 0.62 meters per step).
                       PACE COUNT ADJUSTMENT MATRIX
Terrain Condition            Pace Adjustment Factor    Example (Base: 60 paces/100m)
----------------------------------------------------------------------------------
Flat dirt trail (Base)       x 1.00                    60 paces / 100m
Steep uphill (+15% grade)    x 1.15 to 1.25            70 - 75 paces / 100m
Steep downhill braking       x 1.10                    66 paces / 100m
Heavy backpack (>35 lbs)     x 1.10                    66 paces / 100m
Dense bushwhacking / talus   x 1.25 to 1.40            75 - 84 paces / 100m
Night / darkness navigation  x 1.15                    69 paces / 100m
Using Ranger Beads (Pace Count Beads)
- Lower Tier (9 beads): Slide one bead down for every 100 meters traveled.
- Upper Tier (4 beads): When all 9 lower beads are down and you complete the 10th hundred-meter increment (1,000 meters / 1 km), slide all 9 lower beads back up and slide one upper bead down.
- Total tracking capacity: $4\text{ km} + 900\text{ m} = 4.9\text{ km}$.
Advanced Wilderness Navigation Tactics
Triangulation / Resection (Finding Your Unknown Position)
When you are lost on a map but can see two or three identifiable landmarks on the horizon:
- Shoot a magnetic bearing to Landmark A and convert to a Grid Bearing.
- Calculate the Back-Azimuth (the reverse bearing):
- If bearing is $< 180^\circ$: $\text{Back-Azimuth} = \text{Bearing} + 180^\circ$.
- If bearing is $> 180^\circ$: $\text{Back-Azimuth} = \text{Bearing} - 180^\circ$.
- Plot Landmark A on the map and draw a line along the back-azimuth toward your location.
- Shoot a bearing to a distant Landmark B (ideally 60° to 90° away from Landmark A) and draw its back-azimuth line.
- The point where the lines intersect is your precise map position. (A 3rd landmark forms a small “triangle of error” for confirmation).
Aiming Off
When navigating toward a specific linear point feature (e.g., a footbridge, trail junction, water spring on a creek) across dense forest or fog:
- The Problem: If you aim directly at the bridge and reach the creek, you will not know whether the bridge is upstream to your left or downstream to your right.
- The Solution: Deliberately aim 3° to 5° to the right (or left) of the bridge. When you hit the creek, you know with 100% certainty that the bridge is to your left. Turn left and follow the creek bank directly to the target.
Boxing an Obstacle (90° Offset Method)
When an impassable obstacle (swamp, cliff, deep pond) blocks your direct bearing:
- Stop at the obstacle edge. Note your master pace count.
- Turn 90° Left (or Right) and walk a clear distance (e.g., 50 paces).
- Turn 90° Right (resuming your original compass heading) and walk past the obstacle, counting these forward paces.
- Turn 90° Right and walk the exact same offset distance (50 paces).
- Turn 90° Left to return to your original bearing line and resume your master pace count.
Backcountry Weather Forecasting Toolkit
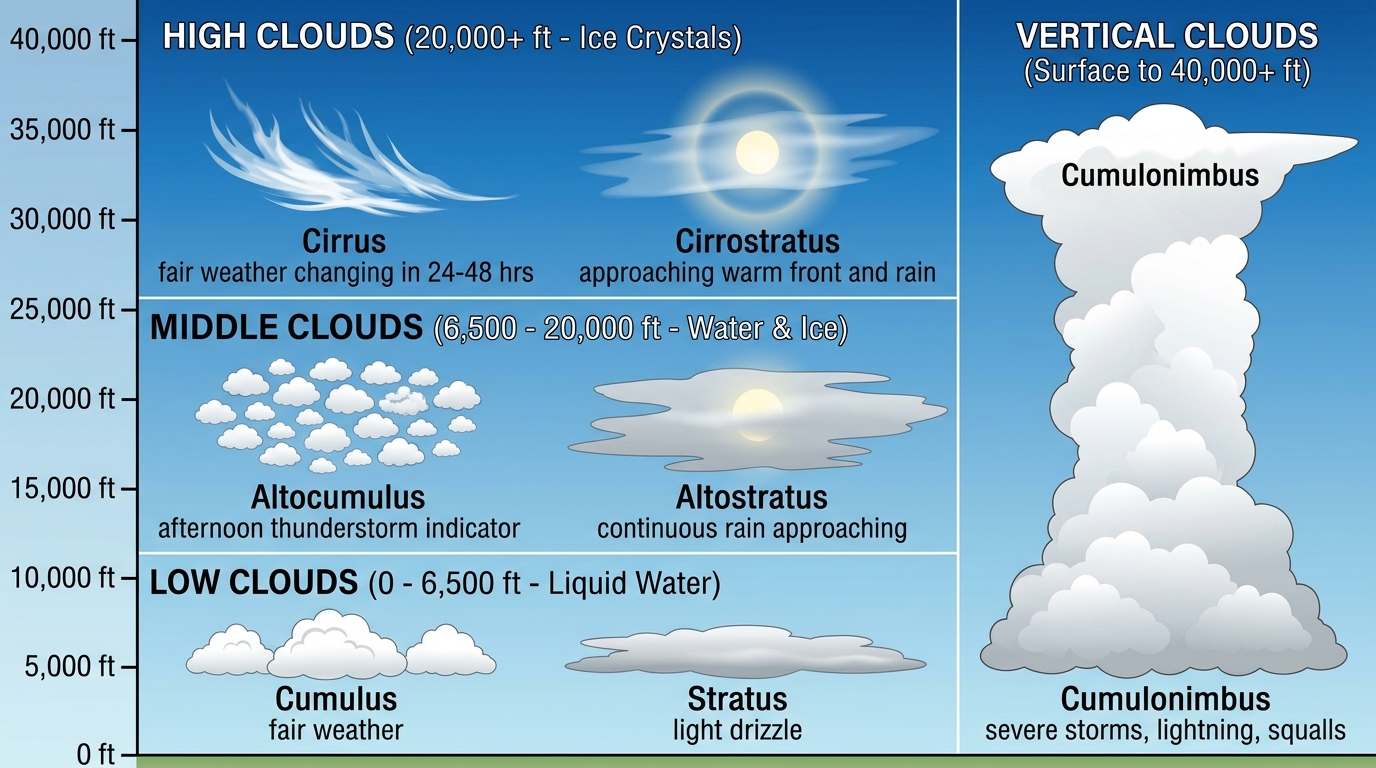
Weather in mountainous and backcountry environments changes violently. Knowing how to read clouds, wind shifts, and barometric pressure trends allows a patrol to seek shelter before disaster strikes.
Cloud Classification & Meteorological Significance
Frontal Systems & Barometric Trends
| Frontal Type | Cloud Sequence | Wind Behavior | Temperature & Pressure | Associated Weather |
|---|---|---|---|---|
| Cold Front | Cumulus $\rightarrow$ Rapid towering Cumulonimbus | Shifting sharply from South/SW to West/NW | Rapid drop in pressure, followed by rapid plunge in temp | Violent squall lines, intense downpours, lightning, followed by cold, crisp, clear high pressure |
| Warm Front | Cirrus $\rightarrow$ Cirrostratus $\rightarrow$ Altostratus $\rightarrow$ Nimbostratus | Shifting gradually from East/SE to South | Slow steady pressure fall; steady temp rise | Widespread, prolonged steady rain/drizzle lasting 12 to 36 hours; low fog and poor visibility |
Cold Front
- Cloud Sequence
- Cumulus $\rightarrow$ Rapid towering Cumulonimbus
- Wind Behavior
- Shifting sharply from South/SW to West/NW
- Temperature & Pressure
- Rapid drop in pressure, followed by rapid plunge in temp
- Associated Weather
- Violent squall lines, intense downpours, lightning, followed by cold, crisp, clear high pressure
Warm Front
- Cloud Sequence
- Cirrus $\rightarrow$ Cirrostratus $\rightarrow$ Altostratus $\rightarrow$ Nimbostratus
- Wind Behavior
- Shifting gradually from East/SE to South
- Temperature & Pressure
- Slow steady pressure fall; steady temp rise
- Associated Weather
- Widespread, prolonged steady rain/drizzle lasting 12 to 36 hours; low fog and poor visibility
Buys-Ballot’s Law & Natural Weather Signs
- Buys-Ballot’s Law: In the Northern Hemisphere, stand with your back directly to the wind. The low-pressure storm center is always located on your left hand (and slightly forward).
- Morning Dew / Frost Rule:
- Heavy morning dew or frost on grass: Indicates a completely clear, cloudless night that allowed maximum ground heat radiation. High probability of fair, sunny weather throughout the day.
- Dry grass at dawn with overcast sky: Clouds trapped heat overnight, indicating high humidity and impending precipitation.
- Campfire Smoke Trends:
- Smoke rises straight and tall: Indicates stable high atmospheric pressure and fair weather.
- Smoke stays low, curls downward, or flattens: Indicates low barometric pressure and humid air preceding an incoming storm.
Navigation & Route Plan Preparation Checklist
Complete this navigational audit prior to stepping off on any backcountry trek
- Topographic Maps: 1:24,000 USGS or waterproof trail maps covering entire trek route plus adjacent escape corridors; stored in heavy-duty waterproof clear map case.
- Magnetic Compass: Sighting baseplate compass with liquid-filled capsule, 2° bezel graduations, magnifying lens, and adjustable declination pre-set for local magnetic zone.
- Coordinate & Distance Tools: Metric 1:24,000 UTM roamer scale card, mechanical pencil, waterproof field notepad, pace count ranger beads attached to pack strap.
- Electronic Backup & Power: GPS / Satellite messenger with pre-cached offline topographic maps, fully charged external battery bank (10,000+ mAh), charging cable wrapped in waterproof zip bag.
- Route Plan & Intentions: Written trip plan filed with Scoutmaster/parents and local ranger station, specifying route waypoints, planned campsites, emergency bail-out escape routes, and strict overdue SAR notification deadline.
- Altimeter & Barometer: Calibrated digital barometric altimeter or watch to track elevation contours and barometric pressure drops.