Knots & Lashings Guide: Hitches, Bends & Camp Gadgets
Ropework is one of the foundational disciplines of outdoor mastery. Whether pitching a storm-resistant tarp, hauling timber, securing a load, building pioneering structures, or executing a wilderness rescue, knowing the exact knot for the job—and tying it correctly under pressure—is essential.
Anatomy of Rope & Cordage
Understanding how a rope behaves requires knowing standard nautical and mountaineering terms.
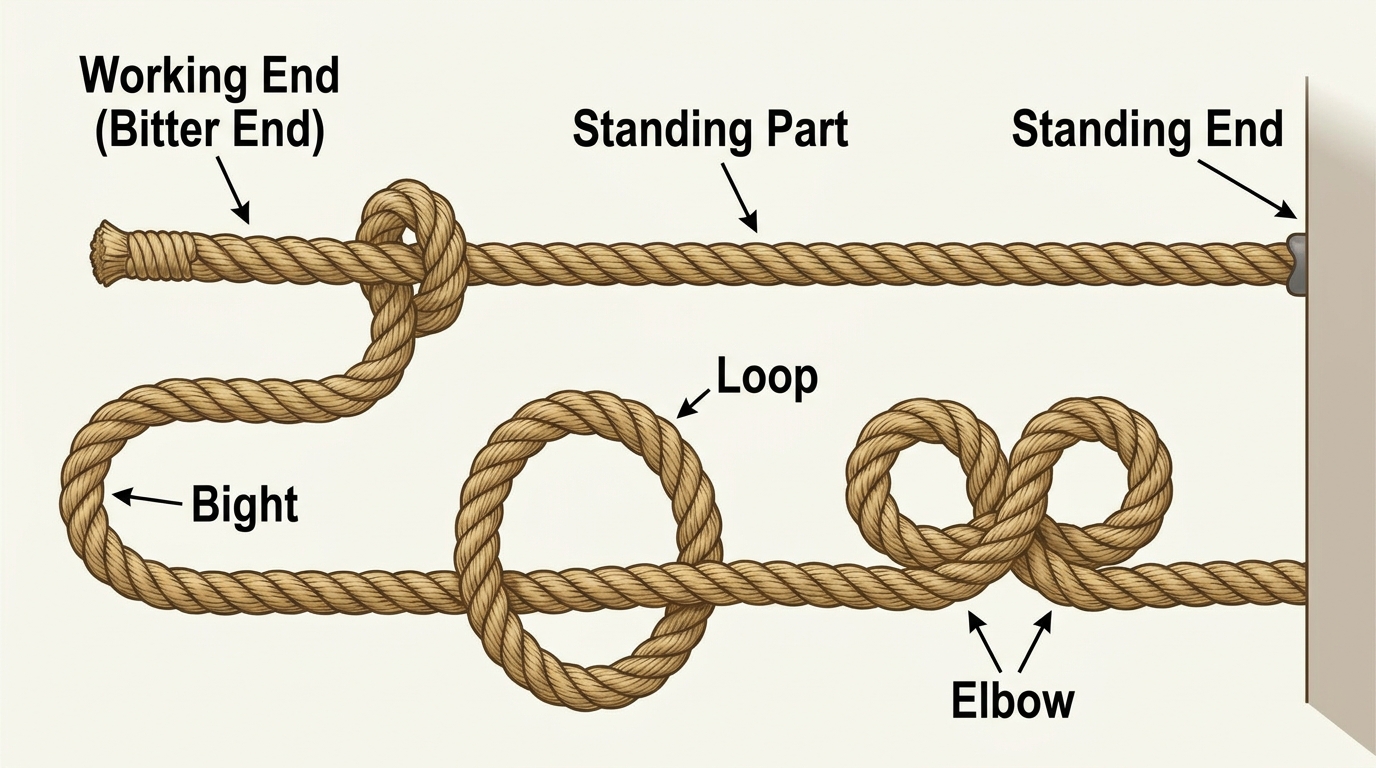
- Working End (Bitter End): The active end of the line used to tie the knot.
- Standing Part: The inactive section of the rope between the working end and the anchor or opposite end.
- Bight: A simple U-shaped curve or loop formed in the rope without crossing the strands over each other.
- Loop: A bend where the rope crosses over or under itself.
- Turn / Round Turn: Wrapping a rope around an object once (Turn) or one-and-a-half times (Round Turn) to generate immense friction before setting a hitch.
- Dress and Set: “Dress it before you stress it.” Arranging all rope strands parallel and neat (dressing) before cinching the knot tight (setting). An undressed knot loses up to 50% of its rated strength and can capsize unexpectedly.
Rope Materials & Characteristics
| Material | Type | Tensile Strength | Stretch / Elasticity | Water / Floatation | UV & Heat Resistance | Primary Scouting Uses |
|---|---|---|---|---|---|---|
| Manila / Sisal | Natural Fiber | Moderate | Low (2–4%) | Absorbs water; sinks; rots if stored wet | High heat resistance; degrades in dampness | Traditional pioneering lashings, obstacle courses |
| Nylon (Polyamide) | Synthetic | Very High | High (15–30% dynamic) | Absorbs ~5% water; sinks; loses 10% wet strength | Moderate UV; melts at ~420°F (215°C) | Dynamic climbing ropes, anchor lines, tow lines |
| Polyester (Dacron) | Synthetic | High | Very Low (sub-5% static) | Hydrophobic; sinks; maintains full wet strength | Outstanding UV & abrasion resistance | Tarp guylines, static climbing lines, halyards |
| Polypropylene | Synthetic | Moderate-Low | Moderate (8–12%) | Completely hydrophobic; floats on water | Poor UV resistance; melts at ~320°F (160°C) | Waterfront throw bags, rescue lines, perimeter markers |
| UHMWPE (Dyneema/Spectra) | Micro-Synthetic | Extreme | Minimal (<1%) | Hydrophobic; floats | Highly slick; poor heat resistance; melts at ~290°F | Ultralight tarp lines, winch lines, specialized cords |
Manila / Sisal
- Type
- Natural Fiber
- Tensile Strength
- Moderate
- Stretch / Elasticity
- Low (2–4%)
- Water / Floatation
- Absorbs water; sinks; rots if stored wet
- UV & Heat Resistance
- High heat resistance; degrades in dampness
- Primary Scouting Uses
- Traditional pioneering lashings, obstacle courses
Nylon (Polyamide)
- Type
- Synthetic
- Tensile Strength
- Very High
- Stretch / Elasticity
- High (15–30% dynamic)
- Water / Floatation
- Absorbs ~5% water; sinks; loses 10% wet strength
- UV & Heat Resistance
- Moderate UV; melts at ~420°F (215°C)
- Primary Scouting Uses
- Dynamic climbing ropes, anchor lines, tow lines
Polyester (Dacron)
- Type
- Synthetic
- Tensile Strength
- High
- Stretch / Elasticity
- Very Low (sub-5% static)
- Water / Floatation
- Hydrophobic; sinks; maintains full wet strength
- UV & Heat Resistance
- Outstanding UV & abrasion resistance
- Primary Scouting Uses
- Tarp guylines, static climbing lines, halyards
Polypropylene
- Type
- Synthetic
- Tensile Strength
- Moderate-Low
- Stretch / Elasticity
- Moderate (8–12%)
- Water / Floatation
- Completely hydrophobic; floats on water
- UV & Heat Resistance
- Poor UV resistance; melts at ~320°F (160°C)
- Primary Scouting Uses
- Waterfront throw bags, rescue lines, perimeter markers
UHMWPE (Dyneema/Spectra)
- Type
- Micro-Synthetic
- Tensile Strength
- Extreme
- Stretch / Elasticity
- Minimal (<1%)
- Water / Floatation
- Hydrophobic; floats
- UV & Heat Resistance
- Highly slick; poor heat resistance; melts at ~290°F
- Primary Scouting Uses
- Ultralight tarp lines, winch lines, specialized cords
Rope Terminal Care: Whipping & Fusing
Unprotected rope ends fray and unravel into useless strands. All ropes must have their ends secured immediately after cutting.
Synthetic Fusing Method
- Cut the rope cleanly with a sharp knife or heated hot-knife.
- Hold the cut end near the blue base of a lighter or candle flame, rotating continuously.
- Allow the fibers to melt uniformly into a solid, rounded bead.
- Press the cooling bead against a flat metal surface to prevent flared caps that will not pass through eyelets or pulleys.
American (Common) Whipping (Natural & Synthetic Rope)
Whipping binds the strands using strong, wax-treated twine (sailmaker’s twine or artificial sinew).
- Cut a length of whipping twine approximately 12–18 inches long.
- Form a small bight with the twine and lay it along the rope end, with the loop pointing toward the bitter end and the short end extending toward the standing part.
- Starting approximately one rope-diameter back from the cut end, tightly wrap the long end of the twine around the rope and over both legs of the bight.
- Continue wrapping neatly with touching, uncrossed turns for a distance equal to the rope’s diameter.
- Insert the active twine end through the exposed small loop of the original bight.
- Pull firmly on the initial short end extending from the bottom of the wrap. This draws the loop (and the active end) halfway under the protective coil.
- Trim both twine ends flush with the whipping coil.
The Core Six Advancement Knots & Hitches
These six knots form the backbone of Scouts BSA rank advancement from Scout to First Class.
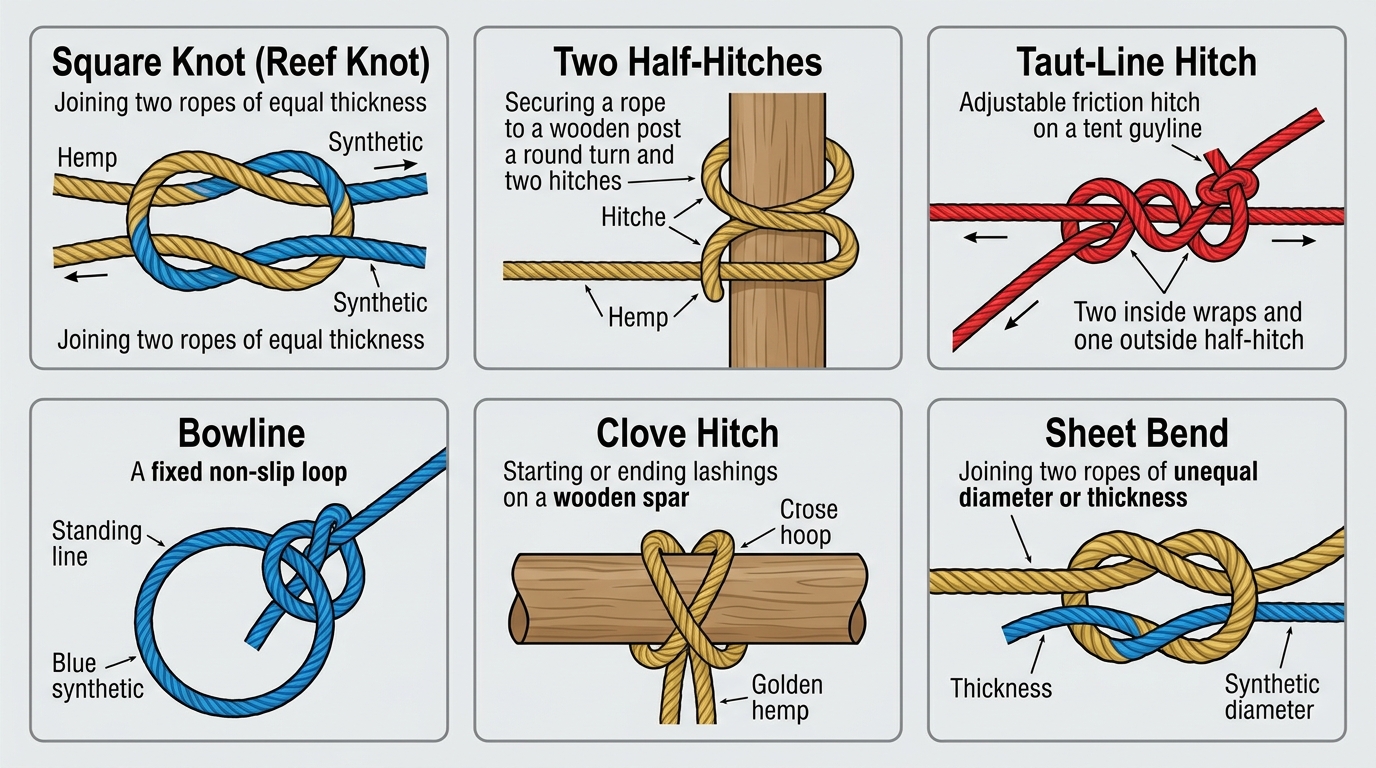
Square Knot (Reef Knot)
Classification: Binding Knot (Joining two ends of a single line around an object).
- Primary Use: Tying packages, securing sail covers (reefing), tying shoelaces, and securing triangular bandages.
- How to Tie:
- Hold one rope end in each hand: Right over Left and under, then Left over Right and under.
- Inspect the knot: Both loops must link cleanly, and both working ends must lie flat along the same side of the standing ropes.
- Critical Limitation: The Square Knot is NOT a bend and must NEVER be used to join two separate ropes under critical tension. Under dynamic loads or when ropes are of different diameters, it capsizes into a slip knot and unties completely.
Two Half-Hitches
Classification: Hitch (Securing a rope to a post, tree, ring, or standing spar).
- Primary Use: Mooring small watercraft, securing clotheslines, and tying cargo down to vehicle anchor rings.
- How to Tie:
- Pass the working end around the anchor post or ring.
- Bring the working end around the standing part and through the inside loop to create the first half-hitch.
- Continue in the same direction: pass the working end around the standing part again and through the second loop to form the second half-hitch.
- Pull the working end tight. Notice that the two half-hitches form a Clove Hitch around the standing part.
- Pro Tip: For extra security under vibrating loads, add a third half-hitch or seize the working end.
Taut-Line Hitch
Classification: Friction Hitch (Adjustable loop knot).
- Primary Use: Tent guylines, dining fly ridge lines, and adjustable lashings. Allows the line to slide freely when adjusted manually, but jams under tension.
- How to Tie:
- Pass the working end around the tent stake or anchor point and bring it back parallel to the standing part.
- Wrap the working end around the standing part inside the loop, moving back toward the anchor stake.
- Make a second wrap around the standing part inside the loop, parallel and adjacent to the first wrap.
- Cross the working end over both internal wraps, moving away from the anchor stake.
- Finish with a half-hitch around the standing part outside the loop, pulling in the same direction.
- Dress the wraps tight against each other.
- Field Adjustment: Slide the knot toward the tent to increase tension; slide toward the peg to loosen.
Bowline
Classification: Fixed Loop Knot (“The King of Knots”).
- Primary Use: Creating a secure, non-slip fixed loop at the end of a line. Used for boat mooring lines, rescue loops around a waist, and hoisting equipment.
- Key Advantage: Will not slip or cinch down under maximum tension, yet unties instantly by snapping the collar backward (“breaking the back”).
- How to Tie (Standard Method):
- Form an overhand loop in the standing part with the working strand on top (the “rabbit hole”).
- Pass the working end up through the loop from beneath (the “rabbit comes out of the hole”).
- Pass the working end around behind the standing part (the “rabbit runs around behind the tree”).
- Bring the working end back down into the original loop (the “rabbit goes back down the hole”).
- Grasp the bight and working end together in one hand and the standing line in the other; pull in opposite directions to set.
Clove Hitch
Classification: Hitch (Fast temporary grip on a cylinder).
- Primary Use: Starting and ending almost all pioneering lashings; tying fenders to boat rails; securing lines to posts.
- How to Tie (Around a Post):
- Wrap the working end around the post once.
- Cross the working end over the front of the standing turn.
- Wrap the working end around the post a second time below the first turn.
- Tuck the working end under the crossover strand.
- Pull both ends in opposite directions to set the hitch firmly.
- How to Tie (Over an Open Post / In the Bight):
- Form two loops in the rope side-by-side (left loop top-over; right loop bottom-under).
- Slide the right loop behind the left loop.
- Drop both combined loops over the top of the post and cinch tight.
Sheet Bend & Double Sheet Bend
Classification: Bend (Joining two separate ropes).
- Primary Use: Joining two ropes of unequal diameter, or joining two wet/slippery ropes.
- How to Tie:
- Form a bight in the thicker (or stiffer) rope.
- Pass the working end of the thinner rope up through the bight from behind.
- Wrap the thin rope completely around the outside of both legs of the thick bight.
- Tuck the thin working end under its own standing line (do not tuck it back into the thick bight).
- Pull both standing parts to set. Both working ends must finish on the same side of the bend.
- Double Sheet Bend: For ropes of extreme thickness difference or slick synthetic lines, make a second full turn with the thin rope around the thick bight before tucking under its own standing line.
Advanced & Utility Knots
Timber Hitch & Killick Hitch
Primary Use: Starting diagonal lashings; dragging heavy logs and tree trunks through woods.
- How to Tie:
- Pass the working end around the timber.
- Pass the working end around the standing line, then wrap (dog) the working end around itself inside the loop at least 3 to 5 times.
- Pull the standing line to jam the coils against the log.
- Killick Hitch Modification: Add a half-hitch around the log 2–3 feet ahead of the timber hitch in the direction of the haul to keep the log tracking straight.
Figure-Eight Knot Family
- Figure-Eight Stopper: A non-jamming stopper knot at the end of a line that prevents the rope from pulling through a pulley, eyelet, or belay device. Outperforms an overhand knot because it does not jam under extreme tension.
- Figure-Eight on a Bight: Quickly creates a strong, reliable fixed loop in the middle or end of a climbing line.
- Figure-Eight Follow-Through (Re-threaded): The gold standard for tying directly into a climbing harness. Retains approximately 75–80% of rope strength. (Tying path: Down, around the back, over the front, and through the top loop).
Prusik Hitch (Friction / Ascending Hitch)
Primary Use: Ascending climbing ropes, hauling systems, adjustable tarp ridge lines, self-rescue.
- Construction: Uses a continuous accessory cord loop (diameter should be 60–75% of the host rope diameter, e.g., 5mm or 6mm cord on 9–11mm rope).
- How to Tie:
- Place the accessory loop behind the main static host rope.
- Pass the loop knot through itself around the main rope.
- Wrap it through the center 2 to 3 times (forming 4 to 6 parallel coils).
- Dress the coils so they sit flat without crossing.
- Under tension, the coils bite into the sheath of the host rope. When unloaded, the hitch slides smoothly by hand.
Double Fisherman’s Bend (Grapevine Knot)
Primary Use: Joining two climbing ropes or forming closed circular loops for prusik cords.
- Forms two symmetrical double overhand knots around the opposing rope’s standing part.
- Extremely high knot efficiency (~70–75%) and will not untie spontaneously.
Water Knot (Ring Bend)
Primary Use: Joining flat or tubular nylon webbing for slings and anchor loops.
- How to Tie: Tie a loose overhand knot in one end of the webbing. Thread the second webbing end in the reverse direction, following every twist and contour of the first knot.
- Caution: Leave at least a 3-inch tail on each end. Webbing can creep under cyclic loading.
Trucker’s Hitch (Power Cinch / 3:1 Pulley System)
Primary Use: Securing heavy cargo, strapping canoes to trailers, and tensioning high-load ridge lines.
- Secure one end of the rope to an anchor with a Bowline or Two Half-Hitches.
- At the midpoint of the rope, form an inline directional loop (using a Directional Figure-Eight or Slip Bight).
- Pass the working end around the opposite anchor point (e.g., truck bed hook) and feed it up through the directional loop.
- Pull downward on the working end: this creates a 3:1 theoretical mechanical advantage (ignoring friction).
- Lock off the tension using two half-hitches around the lower lines.
Pioneering Structural Lashings
Structural Pioneering Lashings
Lashing is the art of joining timber spars using rope to build rigid structures (pioneering towers, signal towers, monkey bridges, camp tables, and raft frames) without nails or bolts.
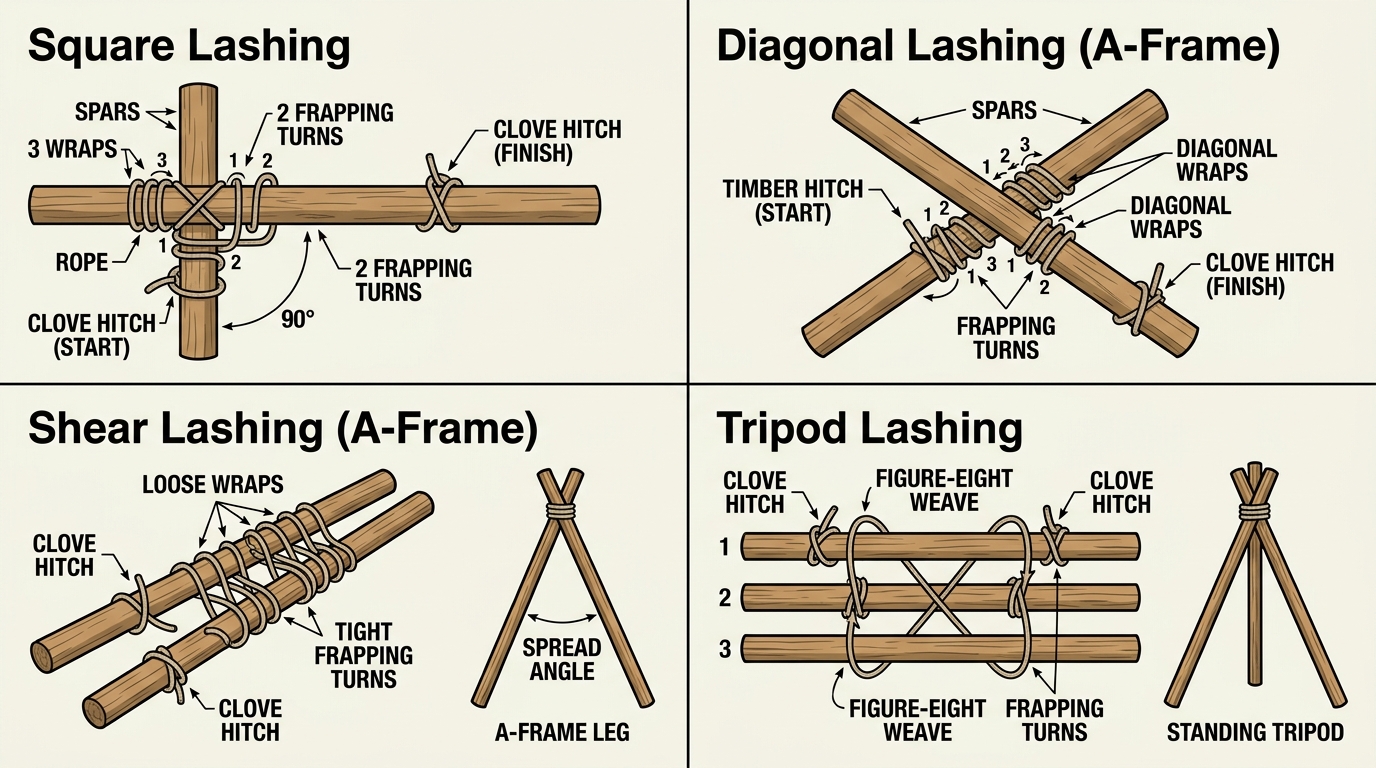
- Rule of Thumb: “Wraps position the poles; Fraps provide the structural tension.”
- Sisal / Manila Cordage: Traditional 1/4-inch 3-strand manila or sisal is the preferred pioneering cordage because its natural fiber surface texture creates superior friction without slipping.
Square Lashing
Use: Joining two spars that cross at right angles (or 45°–90°) where one spar rests on top of the other, supporting downward loads.
- Start: Tie a Clove Hitch around the vertical spar directly beneath the horizontal spar. Twist the short tail into the standing line.
- Wrapping (3 turns):
- Run the rope over the horizontal spar, behind the vertical spar, over the front of the horizontal spar, and behind the vertical spar.
- Lay turns neatly inside-to-outside on one spar and outside-to-inside on the other. Keep maximum tension.
- Frapping (2–3 turns):
- Bring the rope between the two spars and wrap it tightly around the wraps. Cinch each frapping turn with full body weight.
- End: Finish with a Clove Hitch on the horizontal spar.
Diagonal Lashing
Use: Joining two spars that cross at an angle, especially where the spars are under cross-tension or tend to spring apart (cross-bracing).
- Start: Tie a Timber Hitch around both intersecting spars, pulling them firmly together.
- Cross Wraps (3 turns each direction):
- Take 3 tight wraps around both spars across one diagonal fork.
- Cross over and take 3 tight wraps across the opposite diagonal fork.
- Frapping (2–3 turns):
- Make 2 to 3 frapping turns tightly between the spars around all the cross wraps.
- End: Finish with a Clove Hitch on either spar.
Shear Lashing (Shear Legs & A-Frames)
Use: Joining two spars parallel to create an A-frame or bipod legs that spread at the bottom, or extending a spar’s length.
- Start: Lay two spars side-by-side. Tie a Clove Hitch around one spar.
- Wrapping (6–8 loose turns):
- Wind 6 to 8 parallel wraps around both spars.
- Crucial: Keep these wraps slightly loose if forming an A-frame, because spreading the legs creates the final mechanical tension.
- Frapping (2–3 turns):
- Wind 2 to 3 frapping turns between the spars around the wraps.
- End: Finish with a Clove Hitch on the second spar.
- Spread: Spread the spar butts apart to form the A-frame legs; the spread wedges the wraps into extreme tension.
Round Lashing
Use: Fastening two spars strictly parallel to create an extended pole or flagpole.
- Lay the two spars overlapping by at least 2.5 to 3 feet.
- Tie a Clove Hitch around one spar at the overlap.
- Make 8 to 10 very tight, touching wraps around both spars without crossing.
- Finish with a Clove Hitch around the second spar.
- Repeat the entire process at the opposite end of the overlap (two round lashings are required to prevent rotation). Wedges can be hammered between the spars between the lashings to lock tension.
Tripod Lashing
Use: Joining three spars to construct self-standing tripods for washbasins, pioneering towers, cooking spits, and signal towers.
- Lay three spars parallel on the ground, alternating butt ends (e.g., Center butt pointing down, outer butts pointing up, or all butts aligned with small spacers between them).
- Tie a Clove Hitch to an outside spar.
- Weave the rope over and under the three spars in a figure-eight pattern for 5 to 6 full wraps.
- Apply 2 frapping turns between Spar 1 and Spar 2, and 2 frapping turns between Spar 2 and Spar 3.
- End with a Clove Hitch on the opposite outside spar.
- Cross the outer legs and lift the tripod into standing position.
Floor (Decking) Lashing
Use: Fastening walkway planks, tabletop poles, or raft decking across two structural side stringer spars.
- Anchor the rope center or end to one support spar with a Clove Hitch.
- Lay down decking poles consecutively.
- Pass bights of rope over each pole end and loop underneath the supporting spar, chaining down the walkway.
- Tension with a final Clove Hitch or Taut-Line hitch at the terminal plank.
Splicing Quick-Reference
Splicing interweaves individual rope strands to create permanent joints with 90–95% of original line strength, far surpassing knotted cordage.
| Splice Type | Purpose | Method Overview | Strength Retained |
|---|---|---|---|
| Eye Splice | Permanent fixed loop at rope end | Unlay 5 turns; tuck strands under standing line strands against the lay (3 full tucks minimum) | ~95% |
| Short Splice | Permanent union of two equal ropes | Unlay ends; marry strands together; inter-tuck opposing strands (3 full tucks per side). Rope diameter doubles at joint | ~90% |
| Back Splice | Permanent fray-prevention rope end | Form Crown Knot at bitter end; tuck strands backward down the standing line | ~95% |
Eye Splice
- Purpose
- Permanent fixed loop at rope end
- Method Overview
- Unlay 5 turns; tuck strands under standing line strands against the lay (3 full tucks minimum)
- Strength Retained
- ~95%
Short Splice
- Purpose
- Permanent union of two equal ropes
- Method Overview
- Unlay ends; marry strands together; inter-tuck opposing strands (3 full tucks per side). Rope diameter doubles at joint
- Strength Retained
- ~90%
Back Splice
- Purpose
- Permanent fray-prevention rope end
- Method Overview
- Form Crown Knot at bitter end; tuck strands backward down the standing line
- Strength Retained
- ~95%
Pioneering & Lashing Safety Inspection
Run through this mandatory safety checklist before loading any pioneering project
- Spar Integrity: All wooden spars inspected for dry rot, deep longitudinal splits, bug infestations, and excessive bowing.
- Cordage Inspection: Sisal/Manila cordage checked for mold, chemical damage, mildew, broken internal core fibers, and adequate thickness (minimum 1/4" for load-bearing structures).
- Knot Correctness: Every lashing begins and ends with properly dressed Clove Hitches or Timber Hitches.
- Wrap & Frap Tension: Wraps are parallel (uncrossed), and frapping turns are cinched tight without slack.
- Ground Anchoring: Pioneering towers and bridges over 6 feet tall are guyed out to 3-2-1 pickets or deadman log anchors buried at a 45° angle.
- Safety Perimeter: A designated drop zone perimeter is marked with safety tape during all building phases.
- Fall Protection & Load Testing: No Scout climbs onto an untested structure. Adult leader or Senior Patrol Leader performs ground-level load verification.